In this article, I’ll go over how to set up your own public key infrastructure (PKI) by creating a private certificate authority (including both a root and an intermediate CA), creating TLS client certificates for TLS mutual authentication (mTLS), and generating and using code signing certificates.
Prerequisites
- Python 3.8+
- A command line
Getting Started
Whether you’re running internal services or your own homelab, I find it extremely useful to set up a personal certificate authority (CA). This allows you to quickly sign certificates without going through Let’s Encrypt or another vendor. However, the standard procedure of using OpenSSL to generate everything is complicated and confusing. That’s why I created CA Wizard, a script that automates the setup of CA certificates and the generation of server, client, and code signing certificates.
This script is not meant for enterprise or high-stakes production use. Certificate revocation lists (CRLs) and OCSP are not in the scope of this guide or script, however, you should have those set up in a real environment.
To get started, download the script by cloning the repo: git clone https://github.com/andyjsmith/CA-Wizard.git
Install the requirements with pip3 install -r requirements.txt (on Windows it may be pip instead of pip3).
Create a directory where you want to store your certificates. This should be somewhere safe since there is no way to recover them if they’re deleted. Copy the script into this directory and open your terminal here.
Creating Root and Intermediate Certificates
The root certificate is what you’ll need to install on every client that accesses your websites or uses your signed executables. In some scenarios, you will only have a root certificate. However, what happens if your root certificate key is compromised or expires and you need to generate a new one? You’ll have to remove the old certificate and install a new one on every client/endpoint. Depending on the size of your network, this could take a long time. Instead, we can use an intermediate certificate. Rather than issuing certificates with your root CA, your root CA will generate an intermediate CA which is used to sign website, client, and code signing certificates. If the intermediate certificate key is compromised or expires, you can generate a new one and it will automatically be trusted because the root CA is still trusted by all your clients.
To create the root and intermediate, run the script: python3 ca_wizard.py. It will prompt you for information for both. Fill out at least the country code, organization name, and common name. For common name, you should add “root” or “intermediate” to prevent confusion (e.g. Example LLC Root CA).
When asked for the length of time your CA certs should be valid for, your root cert should be very long. If it’s just for your homelab, feel free to set it to 50 years or more, since you will never want to replace this certificate. For production systems, you may want to use a smaller timeframe, but that is out of the scope of this tool and blog post.
1
2
3
4
5
6
7
8
9
10
11
12
13
14
$ python3 ca_wizard.py
It looks like there aren't any existing certificates. Let's create new ones now.
--------------------
Enter a password to encrypt the Root CA key, or leave blank to save unencrypted: ********
Enter the password again: ********
Enter the root CA details. All values are optional.
Country Name (2 letter code): US
State or Province Name (full name):
Locality Name (eg, city):
Organization Name (eg, company): Example LLC
Organizational Unit Name (eg, section):
Common Name (eg, Example Root CA): Example LLC Root CA
Email Address:
How long should the certificate be valid? Enter either in months or years (e.g. 6m or 10y): 50y
Fill out the same information for the intermediate. Make sure to use a different common name and a smaller validity time.
1
2
3
4
5
6
7
8
9
10
11
12
13
--------------------
[Intermediate Certificate Generation]
Enter a password to encrypt the Intermediate CA key, or leave blank to save unencrypted: ********
Enter the password again: ********
Enter the intermediate CA details. All values are optional.
Country Name (2 letter code): US
State or Province Name (full name):
Locality Name (eg, city):
Organization Name (eg, company): Example LLC
Organizational Unit Name (eg, section):
Common Name (eg, Example Intermediate CA): Example LLC Intermediate CA
Email Address:
How long should the certificate be valid? Enter either in months or years (e.g. 6m or 10y): 30y
After that, you should have root and intermediate certificates/keys. If you need to restart, just delete the root and intermediate directories and run the script again.
Installing the Root Certificate
The root CA certificate will need to be installed/trusted on every client device you want to use. The certificate is located at root/root.crt. You may want to copy and rename this file before transferring it to other devices to prevent confusion.
Windows
To automatically install the root certificate on Windows, run the script and choose the “Install root certificate” option. This should prompt you with a yes/no dialog, and choose yes to install it.
If this fails or you otherwise want to do this manually, such as installing it for the local machine rather than just the current user, double click the certificate to open it and click “Install Certificate…”. The Certificate Import Wizard should open. Choose either Current User or Local Machine and click next. Important: Click “Place all certificates in the following store”, do not let it automatically select. Click Browse and select “Trusted Root Certification Authorities”. Click Next and then Finish. A security warning may pop up, so choose yes. The certificate should now be trusted on this device.
Linux
Copy the root.crt file into /usr/local/share/ca-certificates/ (rename the file to something more descriptive) and update the CA store. For example:
1
2
3
4
5
6
7
8
9
10
11
12
$ sudo cp root.crt /usr/local/share/ca-certificates/ExampleCA.crt
$ sudo update-ca-certificates

Updating certificates in /etc/ssl/certs...
rehash: warning: skipping ca-certificates.crt,it does not contain exactly one certificate or CRL
1 added, 0 removed; done.
Running hooks in /etc/ca-certificates/update.d...
Processing triggers for ca-certificates-java (20220719) ...
Adding debian:ExampleCA.pem
done.
done.
Chrome
On Windows, Chrome uses the operating system certificate store, so follow the instructions in Windows. On Linux, Chrome uses its own certificate store. Go to settings, search for certificates, go to Security, click Manage Certificates, Authorities tab, and import the root .crt there.
Firefox
Firefox uses its own certificate store, but it may automatically populate on Windows. If not, or for Linux, go to Firefox settings, search for “certificates”, click “View Certificates…”, go to the “Authorities” tab, click “Import…”, and select the root .crt in the Authorities tab.
Creating a Web Server (HTTPS/TLS) Certificate
To create a certificate for usage on your web server to enable HTTPS, run the script and select the first option. You may be asked to enter the intermediate CA password from earlier.
1
2
3
4
5
6
7
8
9
10
$ python3 ca_wizard.py
What would you like to do?
1) Create a website certificate
2) Create a client certificate
3) Create a code signing certificate
4) Install root certificate (Windows ONLY)
5) Regenerate intermediate CA
6) Exit
Choice: 1
Enter the password you used to encrypt the intermediate CA key: ********
Fill in your website details. The common name should be your domain (e.g. example.com).
1
2
3
4
5
6
7
8
9
10
11
--------------------
[Website Certificate Generation]
Enter a friendly name for the website (e.g. example.com, Example, etc.): example.com
Enter the website details. All values are optional.
Country Name (2 letter code): US
State or Province Name (full name):
Locality Name (eg, city):
Organization Name (eg, company): Example LLC
Organizational Unit Name (eg, section):
Common Name (eg, example.com): example.com
Email Address:
When asked for DNS names, you should enter all domains and subdomains the certificate should be valid for. At a minimum, this should include your domain (e.g. example.com) and can also include wildcard subdomains (e.g. *.example.com).
1
2
3
4
5
Now enter DNS names the certificate should be valid for, one per line. These are the domains your certificate should be valid for (e.g. example.com, *.example.com, test123.example.com). When you're done, leave it blank and press enter.
DNS Name: example.com
DNS Name: *.example.com
DNS Name:
How long should the certificate be valid? Enter either in months or years (e.g. 6m or 10y): 10y
Setting up your web server
The generated certificates are available in the webserver subdirectory. To enable HTTPS on your web server, you need to copy the {name}.key and {name}_fullchain.crt files.
For Nginx, you must add the following lines to your server’s SSL directive, for example:
1
2
3
4
5
6
7
server {
    listen              443 ssl;
    server_name         example.com;
    ssl_certificate     /path/to/example.com_fullchain.crt;
    ssl_certificate_key /path/to/example.com.key;
    ...
}
Read the full Nginx HTTPS documentation.
For Apache, your SSL virtual host should look something like this:
1
2
3
4
5
6
7
Listen 443
<VirtualHost *:443>
    ServerName example.com
    SSLEngine on
    SSLCertificateFile "/path/to/example.com_fullchain.crt"
    SSLCertificateKeyFile "/path/to/example.com.key"
</VirtualHost>
Read the full Apache HTTPS documentation.
If you install the root certificate as described, visiting your website should result in a valid HTTPS connection with no warnings.
Setting Up Client Authentication (mutual TLS)
For me, the main advantage of running your own CA is enabling TLS client authentication. I run some self-hosted services in a VPS I access over the internet. When securing these services, there are a few options. One is to trust the built-in username/password authentication in these web apps. However, who knows if their implementation is secure? Another option is to use a VPN to access the web apps, but that’s a hassle. What if instead, all you had to do was click an ‘Ok’ button? That is what TLS client auth enables. You install a client certificate on your devices, and your web browser presents that to your web apps to give you access. In my opinion, relying on a single authentication mechanism built into Nginx/Apache/etc. is much more secure than trusting individual web apps.
Start by generating a client certificate.
1
2
3
4
5
6
7
8
9
10
11
12
13
14
15
16
17
18
19
20
21
22
23
24
$ python3 ca_wizard.py
What would you like to do?
1) Create a website certificate
2) Create a client certificate
3) Create a code signing certificate
4) Install root certificate (Windows ONLY)
5) Regenerate intermediate CA
6) Exit
Choice: 2
Enter the password you used to encrypt the intermediate CA key: ********
--------------------
[Client Certificate Generation]
Enter a friendly name for the client (e.g. John Doe, [email protected], etc.): JohnDoe
Enter a password to encrypt the client key: ********
Enter the password again: ********
Enter the client details. All values are optional.
Country Name (2 letter code): US
State or Province Name (full name):
Locality Name (eg, city):
Organization Name (eg, company): Example LLC
Organizational Unit Name (eg, section):
Common Name (eg, John Doe, [email protected], John's Phone, DESKTOP-XXXXXX, etc.): John Doe
Email Address:
How long should the certificate be valid? Enter either in months or years (e.g. 6m or 10y): 10y
Installing the Client Certificate
There should now be a client/*.pfx file. On Windows, you can double-click this file and select “Current User”. Enter the password you used when generating the certificate. In the “Import options” section, you can optionally mark the key as exportable so you can save it again later. You can also enable strong key protection, which will require you to enter a password each time you use the certificate to access one of your websites with it.
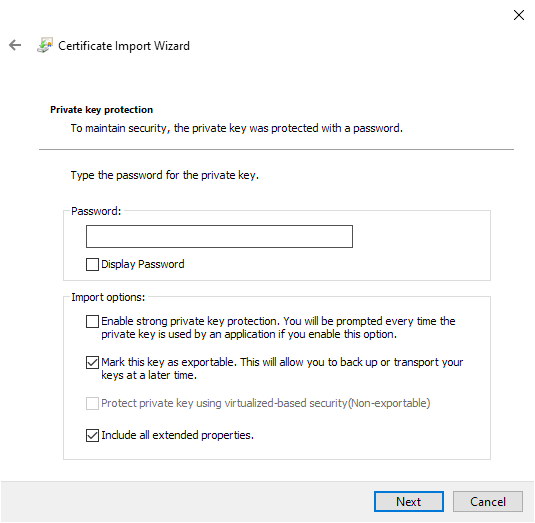
Select “Place all certificates in the following store”, click Browse, and select the “Personal” certificate store.
If you use Mac or Linux, follow the instructions for your distribution. Linux is fairly stubborn about this, so your best bet is to just install it in Chrome/Firefox rather than on the OS itself.
Chrome uses the operating system certificate store so it should work if you installed it in Windows. On Linux, go to settings, search for certificates, go to Security, click Manage Certificates, Your Certificates, and import the .pfx there. Repeat this with the root .crt in the Authorities tab if you haven’t already.
For Firefox, it should automatically find your installed client certificate in Windows. If not, or for Linux, go to Firefox settings, search for “certificates”, click “View Certificates…”, go to the “Your Certificates” tab, click “Import…”, and select your .pfx file. Repeat this with the root .crt in the Authorities tab if you haven’t already.
Setting up your web server
On Nginx, setting up client authentication only requires two lines. First, you need to copy the root/root.crt file onto your server. Then edit your Nginx configuration and add:
1
2
ssl_client_certificate /path/to/root.crt;
ssl_verify_client on;
If you use Nginx Proxy Manager, select your standard SSL certificates in the SSL tab, and add the above lines to the “Custom Nginx Configuration” in the Advanced tab. You will need to copy root.crt into the data directory of your Docker container (near your docker-compose.yml), and then just change the ssl_client_certificate to /data/root.crt.
If you already use real TLS certificates like Let’s Encrypt, etc., you can leave those in place. If you only want to set up client authentication, this doesn’t require you to use the web server certificates generated by this tool.
For Apache, see the documentation.
If you try to access the webpage now, it should prompt you to choose a certificate, for example:
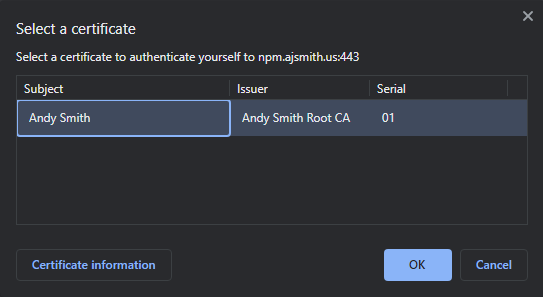
And you should get an error if you click cancel or select an invalid certificate.
Code Signing Certificates
You can also use your new private CA for code signing. Run the script and select the code signing certificate option.
1
2
3
4
5
6
7
8
9
10
11
12
13
14
15
16
17
18
19
20
21
22
23
$ python3 ca_wizard.py
What would you like to do?
1) Create a website certificate
2) Create a client certificate
3) Create a code signing certificate
4) Install root certificate (Windows ONLY)
5) Regenerate intermediate CA
6) Exit
Choice: 3
Enter the password you used to encrypt the intermediate CA key: ********
--------------------
[Code Signing Certificate Generation]
Enter a friendly name for the code signing certificate (e.g. example.com, Example, etc.): Example
Below, common name should usually be your name or your company's name (e.g. Example LLC, John Doe, etc.)
Enter the code signing details. All values are optional.
Country Name (2 letter code): US
State or Province Name (full name):
Locality Name (eg, city):
Organization Name (eg, company): Example LLC
Organizational Unit Name (eg, section):
Common Name (your name or your company's name, e.g. Example LLC, John Doe, etc.): Example LLC
Email Address:
How long should the certificate be valid? Enter either in months or years (e.g. 6m or 10y): 10y
You can now use the codesigning/*.pfx certificate to sign executables. On Windows, an example of this would be:
1
2
3
$ signtool sign /tr http://timestamp.digicert.com /td sha256 /f .\Example.pfx .\test.exe
Done Adding Additional Store
Successfully signed: .\test.exe
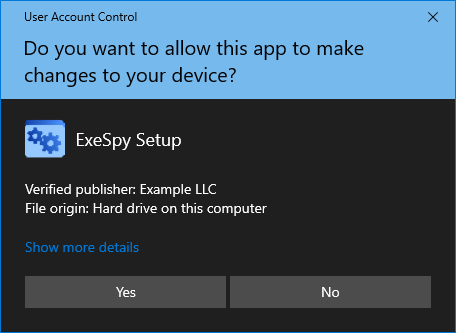
When running the executable as administrator, it changes from this:
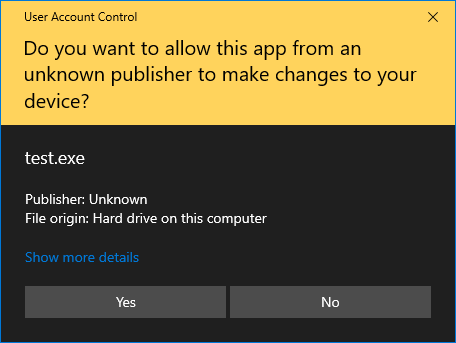
To this: